Creating personalized tumblers has become an exciting and rewarding hobby for many, whether for gifting, branding, or starting a small business. With the rise of advanced crafting tools, the Auto Tumbler Heat Press has made the process faster, easier, and more efficient, especially for beginners. This step-by-step guide will walk you through how to use an Auto Tumbler Heat Press to create stunning designs using sublimation paper and HTV vinyl.
What Is an Auto Tumbler Heat Press?
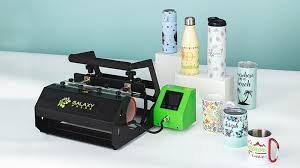
An Auto Tumbler Heat Press is a specialized machine designed to transfer designs onto cylindrical objects like tumblers, mugs, and bottles. Unlike manual heat presses, auto models feature automated functions such as pressure adjustment, timing, and release, making them easier to operate and reducing the chances of user error.
This tool is particularly effective for sublimation and heat transfer vinyl (HTV) projects, allowing you to create vibrant, durable designs with minimal effort.
Materials You’ll Need
Before starting, gather the following materials:
- Auto Tumbler Heat Press – The machine itself, which will handle the heat and pressure needed for your project.
- Blank Tumblers – Ensure they are compatible with sublimation or HTV techniques.
- Sublimation Paper – Used for sublimation printing, this special paper transfers ink onto the tumbler surface.
- HTV Vinyl – Heat Transfer Vinyl is used for creating colorful designs that adhere to the tumbler when heated.
- Heat-Resistant Tape – Essential for keeping your design in place during pressing.
- Design Software – Tools like Adobe Illustrator, Canva, or Silhouette Studio to create and customize your artwork.
- Vinyl Cutter (Optional) – Required for cutting HTV vinyl into precise shapes.
Step-by-Step Guide to Using an Auto Tumbler Heat Press
Follow these steps to create your custom tumbler:
Step 1: Create Your Design
Start by designing your artwork. For sublimation, use sublimation-compatible ink and print your design on sublimation paper. Ensure the design dimensions match the size of your tumbler for proper alignment.
For HTV vinyl, you’ll need to use a vinyl cutter to cut your design from the HTV vinyl sheet. Programs like Silhouette Studio or Cricut Design Space allow you to create intricate patterns, text, or logos. Once the design is cut, weed out the excess vinyl, leaving only the desired elements.
Step 2: Prepare the Tumbler Surface
Clean the tumbler thoroughly with rubbing alcohol or a lint-free cloth to remove any dirt, oils, or residue. A clean surface ensures better adhesion of your design.
Step 3: Position Your Design
For Sublimation:
- Wrap the printed sublimation paper around the tumbler, ensuring the design is aligned properly.
- Use heat-resistant tape to secure the paper in place tightly.
For HTV Vinyl:
- Place the HTV vinyl design onto the tumbler, ensuring it’s positioned where you want it.
- Apply heat-resistant tape to hold the vinyl in place.
Step 4: Set Up the Auto Tumbler Heat Press
Power on your Auto Tumbler Heat Press and set the temperature and time according to the material you’re using:
- Sublimation Paper: Typically requires a temperature of 380–400°F and a pressing time of 40–60 seconds.
- HTV Vinyl: Generally works at a slightly lower temperature, around 300–350°F, with a pressing time of 30–40 seconds.
Adjust the pressure settings based on the thickness of your tumbler. The auto functionality will handle most of the adjustments for you, ensuring consistent results.
Step 5: Press the Tumbler
Place the tumbler into the heat press and close the machine. The Auto Tumbler Heat Press will automatically apply the correct pressure and release once the set time is complete.
Step 6: Cool and Remove the Design
Once the press is complete, carefully remove the tumbler from the machine and allow it to cool.
For Sublimation:
- Peel off the sublimation paper to reveal your vibrant design.
For HTV Vinyl:
- Wait until the tumbler cools slightly, then carefully peel off the heat-resistant tape and backing from the HTV vinyl.
Step 7: Final Touches
Inspect your tumbler for any imperfections. If needed, you can reapply heat to fix minor issues. For added durability, consider sealing the design with a clear protective coating.
Tips for Success
- Test Before You Start: Practice on inexpensive blank tumblers to refine your technique.
- Use High-Quality Materials: Invest in premium sublimation paper, HTV vinyl, and blank tumblers for the best results.
- Follow Manufacturer Guidelines: Each Auto Tumbler Heat Press has specific instructions for temperature, pressure, and time settings. Always refer to the user manual.
- Experiment with Design Variations: Combine sublimation and HTV vinyl techniques for unique, layered designs.
Why Choose an Auto Tumbler Heat Press?
The Auto Tumbler Heat Press is a game-changer for beginners and professionals alike. Its automated features eliminate guesswork, ensuring consistent results every time. Whether you’re using sublimation paper for vibrant, full-color prints or HTV vinyl for bold, textured designs, this machine simplifies the process and allows you to focus on creativity.
Conclusion
By following this step-by-step guide, you can confidently use an Auto Tumbler Heat Press to create stunning, custom tumblers. Whether you’re crafting for personal enjoyment or starting a small business, the combination ofsublimation paper and HTV vinyl opens up endless possibilities for creativity. So, grab your materials, set up your heat press, and start crafting tumblers that leave a lasting impression!